1. Introduction to Oracle
Service Registry:
Oracle
Service Registry is not part of Oracle SOA Suit 11g, Oracle Enterprise Repository /Service
Registry is a Critical part of SOA governance. The combination of the
Enterprise Repository with a UDDI-compliant Service Registry provides a
common communication channel for the automated exchange of metadata and
service information between service consumers, producers, providers, and
additional governance tooling. It provides the visibility, feedback,
controls, and analytics to keep your SOA on track to deliver business value.
The intense focus on automation helps to overcome barriers to SOA adoption
and streamline governance throughout the lifecycle.
Oracle Service Registry (OSR) is a fully
V3-compliant implementation of UDDI (Universal Description, Discovery and Integration),
and one of the key components of Oracle SOA Suite 11g. It allows us to
publish and discover services and service providers, and manage metadata
about services (security, transport, or quality service) using taxonomies.
Therefore, it plays an important role when trying to improve visibility and
promote service reuse. It is also important in the scope of SOA governance.
Service registry is very important for
various reasons. It provides a central place where all service definitions
are stored. This becomes important when the number of services (including
BPEL processes) grows. It helps to maintain overview of services. Service
registry also provides a central place where developers can search for
existing services. This improves service reuse, which is one of the most
important aspects of SOA. Of course, service registry also provides means to
publish services for other developers to discover and reuse.
In addition to reuse, service registry
can also be helpful when we need to migrate services from one server to the
other. This can happen because of various reasons, but one of the most common
reasons is the migration between the development, test, and production
environments. Service registry is also helpful when we need to version
services and manage changes. With service registry we can also develop more
loosely-coupled composite applications, because we do not need to hard-code
the service URLs. Rather, the application will resolve URLs at run-time. In
all cases, service registry is often used together with the ESB. We will not
discuss all OSR details in this article. We will demonstrate how to publish a
service, how to export/import resources between OSB and OSR, how to browse
the OSR using JDeveloper, and how to enable dynamic endpoint lookup in a SOA
composite application.
2. OSR User Creation in DB:
2.1. First we need to create OSR user in oracle DB with admin privileges as sysdba. 
2.2. Next run the osr jar file from command line welcome window open click on next.

2.3.
Select Installation type as Standalone registry click on next.
 2.4.Create registry folder in middleware home directory 
2.5. Select Registry home path from middleware and select check boxes for shortcuts for the Registry from start and desktop.

2.6. This windows is optional if we want email configuration we need to configure SMPT server details.

2.7. Administrator Account Configuration here we need give user name and password to the service Registry controls click on next.

2.8.Database setup here we have to connect to the schema here selecting Populate schema then Click on next.

2.9. Select DB type here select Oracle 10g/11g click on next.

2.10. Provide DB Details of OSR Schema user.

2.11. Select JDBC Data source as default no need to change.

2.12. Next select JDBC Driver location from your db or from web logic server click on next.

2.13. Select account provider information store in DB click on next.

2.14. Select Application server as Oracle Web logic 11g

2.15. Choose deployment of Domain Configuration.
2.16. Select HTTP port for Service Registry Console
click on next.
 2.17. Confirmation window click on next if we want change the property go back.  3. Installing Oracle Service Registry in the Same Domain as Oracle SOA Suite:
When installing Oracle Service Registry 11g in the same Weblogic
Domain as Oracle SOA Suite, you may see the following error message on the
WebLogic Server console when Oracle Service Registry is starting up:
java.lang.LinkageError: loader constraint violation in interface
itable
initialization:....
To work around this issue:
Please refer below link:
Solution:
Better to create managed server in separate web logic domain.
4. Domain Configuration for Service Registry
4.1. We can configure the domain at levels
extending the existing domain. Create new domain with new
Application server and managed server.
Here
I am creating separate domain for service registry.

Click on next.
4.2. Select Domain
Source as Oracle Service Registry click on next.

4.3. Enter domain
location click on next.

4.4. Enter Password
for web logic user click on next.

4.5. Select JDBC
Data source as jdbc/registry enter osr db password and click next.

4.6. Select Admin
Server setting click on next.

4.7. Change the
Admin server port by default it is 7001 we can use any port out of Web logic
click on next.

4.8. Click on Done.

5. OSR Server Start:
Now we can start the Server from
OSR_Domain.
From command line we need to start admin
server and osr server as below:

6. Oracle Service Registry Consoles:
Console windows for
login to Oracle Service Registry Console and Business Service Control go to Programs->
Oracle Service Registry 11.1.1 click on here we can open consoles.
6.1. Oracle Service Registry:
Login Page:
http://localhost:7101/registry/uddi/web

6.2. Business Service Control:
Login Page:
http://localhost:7101/registry/uddi/bsc/web

7. UDDI
Registry Connection in Oracle JDeveloper11g:
Start
JDeveloper and add a new UDDI Registry Connection. We need to provide the
UDDIv2 inquiry url ( http://localhost:7101/registry/uddi/inquiry).
1. Open
the JDeveloper -> click on file menu go to new ->Categories -> General
->click on connections.
Select UDDI
Registry Connection click on ok.

2. Enter
Inquiry Endpoint URL click on next.

3.Next
click on finish and test the connection finally we can see UDDI Registry at
Resource palette

8. Oracle Service Registry reference links:
Download
Oracle Service Registry 11g patch setup from below link:
http://www.oracle.com/technetwork/middleware/registry/downloads/index.html
Download
Oracle Service Registry reference guide from below link:
http://www.oracle.com/technetwork/middleware/registry/documentation/index.html
Cheers...happy installation.
|
Thursday, 18 December 2014
Oracle Service Registry 11g Installation Guide
Friday, 12 September 2014
Oracle API Gateway Integration with OID 11g
1. Introduction:
1.
This document describes how to configure the Gateway to authenticate via
an Oracle
OID directory server and to extract specific Groups.
2.
From the Gateway we will configured to authenticate a user located in the Oracle OID LDAP directory.
3.
If user authenticated successfully then only we have to give access
to the Enterprise Services.

2. Configuring LDAP
Directories:
3. LDAP Connection
Creation:


Before going to creating LDAP repository we should create
the LDAP Connection.
3. LDAP Connection
Creation:
1.
Login to policy studio and connect admin server.
1.
In Navigator click on External Connection tab
-> click on LDAP Connections.
2. Now our
ldap connection ready.
4. LDAP Repository
Creation:

4. LDAP Repository
Creation:
After creation of LDAP Connection next we have to create
repository, for this click on external connection tab again from navigator.
1.
Click on External Connections .Within the
“External Connections” Tree expand the
“Authentication Repository”.
“Authentication Repository”.

3. Click on Add a new Repository -> enter
repository details-> click ok.

5. Configuration of
the HTTP Basic filter:
Now we have to apply http basic
authentication to the service policy. Once deployed the service in oag we can
see the service policy under API Service manager-> Services.

1.
Click on Service policy. Drag HTTP Basic filter
attribute from policy palate. Here we need to browse Our ODI Repository from
drop down list then click on finish.

6. Test the Policy
from API Service Explorer


1.
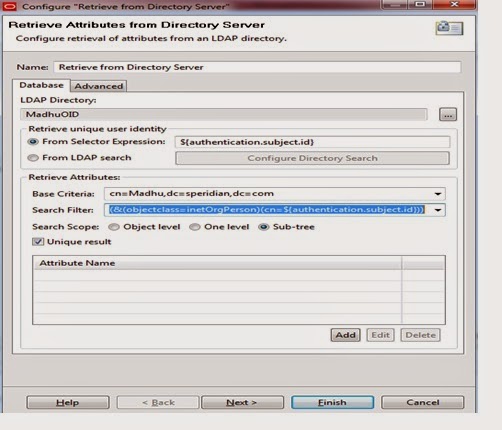
Next drag one more attribute called” Retrieve
from Directory Server” from palate. Here we should browse the LDAP Directory
which we created in in Repository session.
1.
Base Criteria you should pass as Group Name and
Domain details as per OID. Deploy
above changes into the server with the help of f6 key from keyboard.
6. Test the Policy
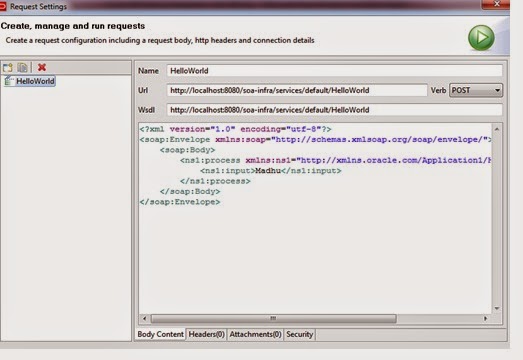
from API Service Explorer
To
test the policy API Service Explorer can be used to send through a message with
user credentials (Username/Password).
1.
Start explorer from apigatewayexplorer folder
location. This tool we are used for testing the services.
Click
on requesting option from run tab.Here we have to pass request message to the
service
1.
Next click on Security tab from below.
1.
Click on HTTP Authentication tab .Here we have
to pass specific user details.
2.
Click on run button.
Happy coding..!!!
Friday, 28 February 2014
Deploying Multiple SOA Composites through ANT
ANT Setup and
Configuration:
1.
Download ant in your system and unzip to your local folder.
2.
Setup ANT HOME as environment variable and give path up to bin in path
variable.
3. Set JAVA HOME as well.

1.
Now you can check from command prompt as below
Open command line enters as ant.

Build Property file:
build. properties
is the file where you have to define the JDeveloper , your middleware home
details and Admin Server ,managed server
credentials.
# build file for DeployComposite
customProcessList=./customProcessList.txt
#composite.name=HelloWorld
#project.name=HelloWorld
# revision of the composite
#composite.revision=1
# Set oracle.home to
<JDEV_HOME>/jdeveloper, where <JDEV_HOME> is JDEV # installation
directory
wn.bea.home=D:/Oracle_FMW
oracle.home=D:/OracleJdeveloper/jdeveloper
java.passed.home=D:/OracleJdeveloper/jdk1.6.0_38
wl.home=${wn.bea.home}/wlserver_10.3
# soa-server side oracle home
directory - needed for deployment plans
# and the weblogic sca library
deployment
soa.server.oracle.home=D:/Oracle_FMW/Oracle_SOA
###### Deployment server
connection information ###############
# the admin server connection
information
admin.server.host=localhost
admin.server.port=7001
# the domain where soa infra is
installed
server.domain.name=soaosb_domain
# connection information for the
managed server, used for soa-deployment
managed.server.host=localhost
managed.server.port=8001
# User and credentials for the
servers
server.user=weblogic
server.password=welcome1
# wls server where soa is
targeted.
server.targets=soa_server1
Text Details:
Before using any of these Ant scripts that are
related to code, you must create a text file.
Create this file place into your application directory where build files are present.
Create this file place into your application directory where build files are present.
For example, the file may look like this:

This says that there are 2 composites to loop
through; HelloWorld, Welcome. If deployed, the first 2
will be
deployed to the 'default' partition and a revision of '1.0'
Build.XML:
Here is main build.xml file it will compile the project and
do the deployment in our target server.
<?xml version="1.0" encoding="UTF-8"
?>
<project name="AutomaticDeployment"
default="deployComposites">
<echo message="entered screen"/>
<!-- build.properties -->
<property
environment="env"/>
<taskdef
resource="net/sf/antcontrib/antcontrib.properties"/>
<taskdef
resource="net/sf/antcontrib/antlib.xml" >
<classpath>
<pathelement
location="${antcontrib}" />
</classpath>
</taskdef>
<property file="build.properties"/>
<!-- Add targets here -->
<target name="compile-package">
<property name="sca-inf.classes.dir"
value="../SCA-INF/classes"/>
<mkdir dir="${sca-inf.classes.dir}"/>
<echo
message="reached....${oracle.home}..........."/>
<ant
antfile="${oracle.home}/bin/ant-sca-package.xml"
target="package" inheritall="false">
<property name="oracle.home"
value="${oracle.home}"/>
<property name="compositeDir"
value="${basedir}/${project.name}"/>
<!-- needed for adf config
-->
<property name="scac.application.home"
value="${basedir}/${project.name}/.."/>
<!-- name of the composite
-->
<property name="compositeName"
value="${composite.name}"/>
<!-- revision of the
composite -->
<property name="revision"
value="${composite.revision}"/>
<!-- java.passed.home passed
to scac, this property will be
overwritten to the env.JAVA_HOME
if such env variable is defined in OS level-->
<property name="java.passed.home"
value="${java.passed.home}"/>
<property name="wl_home"
value="${wl.home}"/>
</ant>
</target>
<!--<target
name="deploy" depends="compile-package">
<condition property="deploymentplan.name"
value="null">
<not>
<isset property="${deploymentplan.name}"/>
</not>
</condition>
<echo>Deploying to http://${managed.server.host}:${managed.server.port}/soa-infra/deployer</echo>
<ant
antfile="${oracle.home}/bin/ant-sca-deploy.xml"
target="deploy"
inheritall="false">
<property name="user"
value="${server.user}"/>
<property name="password"
value="${server.password}"/>
create the url for deployment
<property name="serverURL"
value="http://${managed.server.host}:${managed.server.port}/soa-infra/deployer"/>
location of the sar
<property name="sarLocation"
value="${deploy.dir}/sca_${composite.name}_rev${composite.revision}.jar"/>
force overwrite if already there
<property name="overwrite"
value="true"/>
configplan
<property name="configplan"
value="${deploymentplan.name}"/>
</ant>
</target> -->
<target name="deployComposites">
<available
file="${customProcessList}" property="file.exists"
value="true" />
<fail
unless="file.exists" message="ERROR: Filename
'${customProcessList}' does not exist." />
<loadfile
property="allprocesses" srcFile="${customProcessList}"/>
<var
name="errorCount" value="0"/>
<var
name="processCount" value="0"/>
<var
name="errorProcessNames" value="(none)"/>
<trycatch
property="tryName" reference="exception_ref">
<try>
<for
list="${allprocesses}" param="processName"
delimiter="${line.separator}">
<sequential>
<propertyregex property="composite.name" input="@{processName}"
regexp="(.*),(.*),(.*),(.*),(.*)" select="\1" override="true"/>
<propertyregex property="composite.partition"
input="@{processName}" regexp="(.*),(.*),(.*),(.*),(.*)"
select="\2" override="true"/>
<propertyregex property="composite.revision" input="@{processName}"
regexp="(.*),(.*),(.*),(.*),(.*)" select="\3" override="true"/>
<propertyregex property="default.composite" input="@{processName}"
regexp="(.*),(.*),(.*),(.*),(.*)" select="\4"
override="true"/>
<propertyregex property="folder.name" input="@{processName}"
regexp="(.*),(.*),(.*),(.*),(.*)" select="\5" override="true"/>
<!--
<property name="deploy.dir"
value="${basedir}/${folder.name}/deploy"/> -->
<math
result="processCount" operand1="${processCount}"
operation="+" operand2="1" datatype="int"/>
<echo>
================================================================================
PACKAGE COMPOSITE #${processCount}: ${composite.name}
================================================================================
</echo>
<ant
antfile="${oracle.home}/bin/ant-sca-package.xml" target="package"
inheritall="false">
<property name="compositeDir"
value="${basedir}/${folder.name}"/>
<property name="compositeName"
value="${composite.name}"/>
<property name="revision"
value="${composite.revision}"/>
</ant>
<echo>
================================================================================
DEPLOY COMPOSITE #${processCount}: ${composite.name}
================================================================================
</echo>
<ant
antfile="${oracle.home}/bin/ant-sca-deploy.xml"
target="deploy" inheritall="false">
<property name="user" value="${server.user}"/>
<property name="password" value="${server.password}"/>
<property
name="serverURL" value="http://${managed.server.host}:${managed.server.port}/soa-infra/deployer"/>
<property name="sarLocation" value="${basedir}/${folder.name}/deploy/sca_${composite.name}_rev${composite.revision}.jar"/>
<property name="partition" value="${composite.partition}"/>
<property name="overwrite" value="true"/>
<property name="forceDefault" value="${default.composite}"/>
<!--
<property name="configplan" value="${deploymentplan.name}"/>-->
</ant>
</sequential>
</for>
</try>
<catch>
<property
name="exception" refid="exception_ref" />
<property
name="message" value="ERROR IN TRYCATCH BLOCK:${line.separator}${exception}"
/>
<echo></echo>
<echo
message="${message}" />
<math
result="errorCount" operand1="${errorCount}"
operation="+" operand2="1" datatype="int"/>
<var
name="errorProcessNames" value="${composite.name}"/>
</catch>
</trycatch>
<echo>
**************************************************************
*
* ANT TARGET
NAME: deployComposites
* FAILED
PROCESS: ${errorProcessNames}
*
**************************************************************
</echo>
</target>
</project>
Note:
Please place ant-contrib-1.0b3
.jar under ant home inside lib folder.you have to download from internet this jar.
your application looks like below:

happy deployment with ant.
Wednesday, 20 November 2013
HAFileAdapter in OSB Cluster Environment
If you are using jca file adapter in OSB for business service or proxy service and while deploying into cluster Environment instead of file Adapter change to HAFileAdapter
Go to deployment in console -> click on file adapter -> click on HAFile Adapter ->go to properties -> enter below details

Go to Datasource ->jdbc/SOADataSource select target server as OSB Server
->jdbc/SOALocalTxDataSource select target server as OSB Server

Go to deployment in console -> click on file adapter -> click on HAFile Adapter ->go to properties -> enter below details

Go to Datasource ->jdbc/SOADataSource select target server as OSB Server
->jdbc/SOALocalTxDataSource select target server as OSB Server

Subscribe to:
Posts (Atom)
Oracle Opatch utility 12c
Hi Blog Viewers, This post will describes the how to apply single or multiple patches at a time. Prerequisites : Set the Oracle Home and Op...

-
Defining Complex Condition in choice Condition Using Native format builder we can pick different kind of records from flat file. Samp...
-
Complex Flat File fixed length in NXSD Ex: 20130210 à Header ...
-
 Today am going to explain how to insert fixed length records into db. Here is the example: For processing fixed length file, we ...